
Contact
Welcome to the PatentMaker Support Center!
We are here to help you in any way we can to make your experience with PatentMaker the best. Please choose the appropriate section below.
LOrem ipsum
Lorem ipsum dolor sit amet

How to install PatentMaker?
The latest version of the generic installer can be downloaded from http://patdoc.net/installer – this will download and install the application into a PatentMaker folder in their Windows profile directory (i.e. C:\Users\WINDOWSUSER\PatentMaker).
The installation of PatentMaker does not require administrator rights.
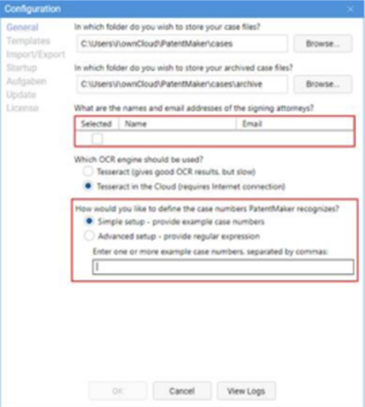
When PatentMaker is started for the first time, a few settings must be made. To do this, after starting PatentMaker, you must first open the settings via the gear icon.
How to install PatentMaker?
Under General:
- the local storage path for the respective files; best under
- C:\Users\*username*\ownCloud\Files\PatentMaker\Cases
- the local archive folder (which files will be stored here after completion),
C:\Users\*username*\ownCloud\Files\PatentMaker\Cases\ARCHIVE - the personal User-ID, which can be found in the opened file management (double click on file number) at the bottom left.
- the name and email address of the lawyer which appear on the form letter.
- the type of text recognition. (The paid “Nuance Power PDF Advanced” provides very good results. Alternatively, “Tesseract OCR” with “AWS
Lambda” can be selected. The cloud-based recognition is usually faster).
Under Templates:
- the location that should appear on the form letter as the return address.
- the optional use of local form letter templates, if desired.
- installation of the new PDF Reader.
PatentMaker is best used together with the (free) PDF-XChange Editor, e.g. PDF-XChange Pro 8. The PDF XChange Editor offers the option to create shortcuts and to adjust the display, especially with regard to the use with a widescreen monitor.

test

test

test

test
test

test
test

test


